
Friday, October 25, 2013
Urban Unisex Hoodie Costumes!
I mentioned in the Urban Unisex Hoodie tutorial that I've used this pattern to make several costumes. Four, to be exact-a cat, a dog, Dora, and her friend Boots the Monkey. Today I blogged about them over at That's What She Crafted, check it out!
Monday, October 7, 2013
Some Halloween sewing
Sorry I've been so absent lately. Busy testing TONS, plus working, and school just started up again. I'm exhausted. This is really just a quickie post to share some of the Halloween sewing I've been doing lately/share some testing I've been doing.
First up is the Tilly combo dress by Little Kiwi's Closet.
 It's a knit/woven combo dress, knit top in both a tank and sleeve version, and a woven ruffled skirt. I'm super into combo dresses lately, and ruffles. This one has both! I'd been eying (spellcheck insists that 'eyeing' is not how that word should be spelled. Seriously? It looks so weird without the second 'e') several Halloween prints and this was the perfect pattern to use them up.

Next up on the block is the new Wonderland Dress by Heidi & Finn.

I was so excited to get chosen to test for this dress, I knew exactly what I wanted to do with it. The simple bodice cries for embellishment, and I'd been wanting to try freezer paper stenciling for awhile so I gave it a go. I used a lime green fabric paint, and it's hard to see in the pictures but it is SUPER glittery, I mixed about half a tube of glitter into the paint before applying it to the fabric.

Unfortunately the hooligan wasn't feeling especially cooperative when I asked for pictures, so I don't have many good ones to share.
The last one I'm sharing today is the Candy Castle Princess by Candy Castle Patterns.

This is the one I did for the testing, it is the Winter Wonderland version. This pattern comes with an unbelievable number of options (4 sleeve options, 2 fit options, 2 top skirt options, and 2 underskirt options. Possibly more. There might be so many options that I'm forgetting some.)

Now, I know it doesn't look like it should belong in this Halloween post, but if you head on over to the CCP group on Facebook (where there is currently a sew along for this dress) you'll see all the beautiful costumes those talented ladies are creating with this pattern. I made a Belle costume for my girl out of it, but you'll have to wait til I get decent pictures to see it.
That's just a few of the tests I've been doing. I've got a few more I've done but can't share yet, hopefully soon!
First up is the Tilly combo dress by Little Kiwi's Closet.


Next up on the block is the new Wonderland Dress by Heidi & Finn.

I was so excited to get chosen to test for this dress, I knew exactly what I wanted to do with it. The simple bodice cries for embellishment, and I'd been wanting to try freezer paper stenciling for awhile so I gave it a go. I used a lime green fabric paint, and it's hard to see in the pictures but it is SUPER glittery, I mixed about half a tube of glitter into the paint before applying it to the fabric.

The last one I'm sharing today is the Candy Castle Princess by Candy Castle Patterns.

This is the one I did for the testing, it is the Winter Wonderland version. This pattern comes with an unbelievable number of options (4 sleeve options, 2 fit options, 2 top skirt options, and 2 underskirt options. Possibly more. There might be so many options that I'm forgetting some.)

Now, I know it doesn't look like it should belong in this Halloween post, but if you head on over to the CCP group on Facebook (where there is currently a sew along for this dress) you'll see all the beautiful costumes those talented ladies are creating with this pattern. I made a Belle costume for my girl out of it, but you'll have to wait til I get decent pictures to see it.
That's just a few of the tests I've been doing. I've got a few more I've done but can't share yet, hopefully soon!
Monday, September 16, 2013
How To: Make the Urban Unisex Hoodie Reversible

This is a tutorial on how to take the already super wonderful Urban Unisex Hoodie by Heidi & Finn and make it even more versatile than it already is. If you're dubious that a hoodie pattern can be incredibly versatile, let me assure you, it can be. With this pattern I have made countless hoodies, 4 separate costumes (cat, dog, Dora, and Boots), and a rain coat. There are also many other adaptations to be found out there, such as converting it to have a zipper opening.
(Fun fact about this pattern- it was the first PDF pattern I ever purchased.)
Ready to get started?
First step is to cut out and sew the pattern as directed all the way up to attaching the hood. Lay it out and pin as instructed in the pattern. Now sew along the sides and the top, NOT the bottom, right along the green line in the picture below.

Turn it right sides out and iron the seams. (If you want, I didn't on this particular one and it turned out fine.)
Now you're going to take the sides and fold them so the edges are overlapping, making sure both the top and bottom are even. Pin and sew this edge, stopping a few inches from the top. Make sure you are only sewing the two flaps together, don't catch the back or the hoodie. That would be disastrous.
 |
| That text should say "Pin and sew..." |

Time to place your snaps! You can do as many or as few snaps as you like, in one row or several. Spacing is also up to you. I usually just do one row of three snaps, but this time decided to do two and two. Now, the original pattern calls for buttons, but for the reversible version it has to be snaps. (I use Kam Snaps.)

Makin' progress! Next step is to attach the band. Take your band and lay it flat out. Fold over one long edge and iron it down. Repeat for the other long edge.

Fold in half "hot dog style", wrong sides together. Iron the edge.

Now unfold the middle seam, and also unfold the very ends of the edges. Fold in half right sides together, "hamburger style" this time, and sew the short ends together.

Fold the edges back down, and fold along the center crease again, so you've got a tube of fabric folded in half, with the raw edges folded inside.
Now for the
In the picture below, on the very bottom is one layer of the band with the edge folded down, and on top of that is the bottom edge of the hoodie. Then the other side of the band is brought up and pinned down, encasing the raw bottom edge of the hoodie within the band.

 |
| Sorry, didn't realize the picture was so blurry til after I was finished. |
Do this all the way around, pinning lots.
Time to sew. Sew where you pinned, making sure you catch all the layers; the top layer of the band, both layers of the hoodie (all 4 layers at the point in the front where they overlap), and the bottom layer of the band.
Way to go!
It's really not as bad as I made it sound, it's just my least favorite
part of making these hoodies, even though it's the crucial part that makes them reversible.
Now all that's left to do is finish the sleeves. Most of the time I'm lazy and leave off the cuffs. I just do a rolled hem to get a cute lettuce edge for my girly. Alternatively, you can attach the cuffs using the same method we just used to attach the band.
Congratulations, you have now achieved a whole new level of completely reversible awesomeness.

Saturday, September 7, 2013
Pencil Applique Tutorial
Remember this?
 The Bubblegum Swing Dress that I made as part of the sewalong, featuring an adorable alphabet print fabric and handmade pencil applique. I promised a tutorial on that applique, and I'm keeping that promise!
I usually make my appliques using my Cricut machine, but I didn't have a cartridge that had a pencil on it. I'm terrible at drawing, so that was out of the question. I set off in search of an acceptable image on the world wide web. This was the one I settled on.
 I had originally planned on taping a piece of Wonder Under to the screen and tracing it that way, but then I remembered someone sharing a trick of printing out patterns directly onto freezer paper, and thought I'd see if I could do the same with the Wonder Under.
First cut a piece of the Wonder Under (I prefer Heat n' Bond brand, but others should work the same) to the same size as a piece of printer paper.

The Wonder Under curled back up, but it didn't interfere with anything, just place it in the printer so the image will print on the paper backed side, not the adhesive side. Scale your image to your desired size, and print.

I failed to take a picture of this part, but cut out an additional piece of wonder under a little bit bigger than your image to be the backing for the applique.
Then cut the individual parts of the image out.

Apply the wonder under pieces to the wrong side of it's corresponding fabric, including a piece of fabric for the backing.

The large tan piece is the backing, then each of the individual pieces. Trim the excess fabric around each piece (except the backing piece).
More failure to take pictures, although I could have sworn I did, but I can't locate any.
After each piece is trimmed, apply them one at a time to the backing, recreating your desired image. Once all pieces are applied, trim the excess fabric of the backing along the outline of your image. Your applique is now ready to to put onto your item! Just iron it down, and then stitch along each piece using either a satin stitch or a zig zag, then also along the outline.
Admire your finished product!

Much less painful than trying to freehand a design, and less labor intensive than trying to trace right from the computer screen. I hope you try it, let me know how it works for you!

I usually make my appliques using my Cricut machine, but I didn't have a cartridge that had a pencil on it. I'm terrible at drawing, so that was out of the question. I set off in search of an acceptable image on the world wide web. This was the one I settled on.

First cut a piece of the Wonder Under (I prefer Heat n' Bond brand, but others should work the same) to the same size as a piece of printer paper.
 | |
| Getting ready to trace |


I failed to take a picture of this part, but cut out an additional piece of wonder under a little bit bigger than your image to be the backing for the applique.
Then cut the individual parts of the image out.

Apply the wonder under pieces to the wrong side of it's corresponding fabric, including a piece of fabric for the backing.

The large tan piece is the backing, then each of the individual pieces. Trim the excess fabric around each piece (except the backing piece).
More failure to take pictures, although I could have sworn I did, but I can't locate any.
After each piece is trimmed, apply them one at a time to the backing, recreating your desired image. Once all pieces are applied, trim the excess fabric of the backing along the outline of your image. Your applique is now ready to to put onto your item! Just iron it down, and then stitch along each piece using either a satin stitch or a zig zag, then also along the outline.
Admire your finished product!

Much less painful than trying to freehand a design, and less labor intensive than trying to trace right from the computer screen. I hope you try it, let me know how it works for you!
Friday, August 30, 2013
Exciting things!
So as I mentioned before, one of the prizes of the Candy Castle Sewalong was a spot as a tester for her next pattern, the awesome Triple Layered Cake Tunic. Testing just finished so I'm finally allowed to post pictures!


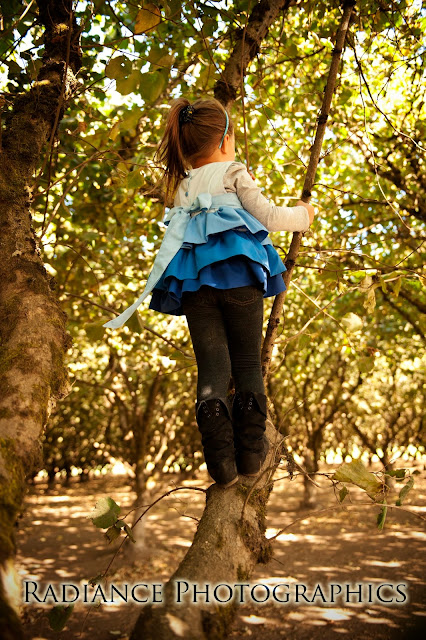


This was my very first time being a tester EVER, and I lucked out on not only an amazing designer, but an amazing pattern as well. As soon as I saw a picture of the pattern I knew exactly what I wanted to do. It screamed "ombre!" Choosing the color was a bit more involved, I wasn't expecting to have such a hard time finding 5 shades of the same color, but finally managed to find 5 shades of blue that looked fabulous together.

I've got so many more ideas for it swimming in my head, I'll definitely be making more of them. Unfortunately the pattern won't be released for another month or so, when they release the rest of the Fall line. You can expect more from me about this pattern as the release draws closer though. :) You can also stay up to date on the progress of the Fall Line and get in on the many awesome contests and games that Candy Castle Patterns offers by joining the CCP Facebook group.
In other exciting news, I also managed to score a position as a tester for Fishsticks Designs which I am incredibly excited about. I've been trying to break into the tester world for months with zero luck, then suddenly I manage to get in not just once, but twice!
That about covers everything exciting going on here, so I shall leave you with more pictures of the unbearable cuteness that is my daughter in her Blueberry Creme Triple Layered Cake Tunic.


Friday, August 23, 2013
Candy Castle Sewalong Conclusion!
Bah! I meant to post this a week ago, but apparently I haven't yet mastered the schedule feature of Blogger. *sigh* I suppose late is better than never. Sorry for the delay.
--------------------
I apologize for the amount of time between this post and the last one. I had intended to post pictures of the dress as soon as I finished, but then the very day after, I dislocated my finger. I don't even have an awesome story about how I did it, like fighting a ninja or getting caught in a stampede of unicorns. I tripped over a curb. Or my own feet, I'm not really sure. All I know is one minute I was walking and the next I was falling. I thought for sure my finger was broken, but after a 4 hour wait in Urgent Care found out it was only dislocated. It's all sorts of pretty shades of purple, and still pretty sore, so please forgive any typos.
Anyways, here's my finished dress.


My girl had so much fun with our little "photo shoot". She had so many ideas about what she wanted to do. All I heard was "Mommy, how about one with my backpack, and now one of me twirling. Can I hold the pencil like this? Now of me sitting down." It was fun to see her so excited about it. In the one on the right I had written " I (heart) Candy Castle Patterns!" and below it a math problem for her to do, and then she wrote "I luv my new dress".
If you didn't guess from the sneak peek I posted last time, my "special detail" was a pencil applique. (Tutorial in the works!) I really love how the applique turned out. While in the process of making it I wasn't sure how it would turn out and how it would actually look on the dress, but when I finally put the two together I was thrilled.

Turns out I wasn't the only one thrilled with it though, because I was chosen as the winner! I was so unbelievably shocked to wake up and see that I won. There were SO MANY beautiful dresses, each one was really a work of art. Looking through them all I was in awe, I thought no way did I even have a chance of winning. I'm so excited though, not only do I get two free patterns, but I get to be a pattern tester for her next design which I got to see today. I already have an idea in my head of what I want to do with it, so I'm anxious to get started.
As hokey as it sounds though, I really think the best prize of the sew along was the experience. It was so much more fun than I thought it would be, working along with so many wonderfully creative women and seeing how each one brought their own spin to it. I can't wait for the next one, I might be a sewalong addict now!
Wednesday, August 7, 2013
Almost finished!
Woohoo! We are heading into the final stretch of the sew along! Tomorrow is the last day for skirt construction, and then we move on to the finishing touches. It's been really hard to make myself follow the schedule and not skip ahead, but I've done it. I am so anxious to move on to the next step though, delayed gratification is not my strong suit. I'm one to stay up til 2:30 in the morning to finish a project rather than put it down and go back to it in the morning.
 I'm really pleased with the way the piping turned out. I like the separation it gives the bodice and the skirt. I also added a little band of yellow at the bottom between the letters and the red. True to form though the cautious side kicked into my crafting. The decision making process about adding it was extensive. I wasn't sure if I should keep it just the simple red or add the yellow pop. Then it was deciding which yellow to use. Then second guessing myself.
At this point I'm still unsure about the dress overall. I think a large part of that though is still that it's unfinished. I have a really hard time seeing the end product when I'm in the process of creating it. And that I haven't seen it on my girl yet. I guess we'll see in a couple days though!

At this point I'm still unsure about the dress overall. I think a large part of that though is still that it's unfinished. I have a really hard time seeing the end product when I'm in the process of creating it. And that I haven't seen it on my girl yet. I guess we'll see in a couple days though!
Subscribe to:
Posts (Atom)